I’m going to level with you, this isn’t a polished product created by an experienced copywriter or a 99x certified Salesforce Architect/Developer/Administrator, this is a guide written by me – an internet stranger with one (1) Salesforce admin certificate and just a year’s worth of experience.
There are tons of guides out there that are probably better written and penned by far more experienced people, you’re certainly welcome to read those but I hope you give this one a shot. Not just because I asked my much more experienced boss to review it (Hi Jon!) but also because I think it provides a decent overview.
What are Salesforce Flows?
Flows are Salesforce’s primary automation tool. You can automate business processes and repetitive tasks, create and update records, make sure necessary tasks are being done, etc. Flows make your life easier, work go smoother, and they save you time and money you would’ve otherwise spent doing things manually.
Flows are a declarative tool instead of imperative. You might’ve heard the phrase “Clicks not code.” Flows are exactly that, a point-and-click / drag-and-drop tool that lets you create a lot of the same processes and automations a developer would make by coding and programming. So instead of having to hire a dev, you can use the Salesforce Flow Builder to create the automations yourself.
But, while flows are very powerful, there are still limitations. A skilled developer can build applications from the ground up and they’re able to customize it extensively, so there’s more freedom and flexibility when it comes to specific functionality. If your requirements go beyond what flows are capable of handling, contact a developer.
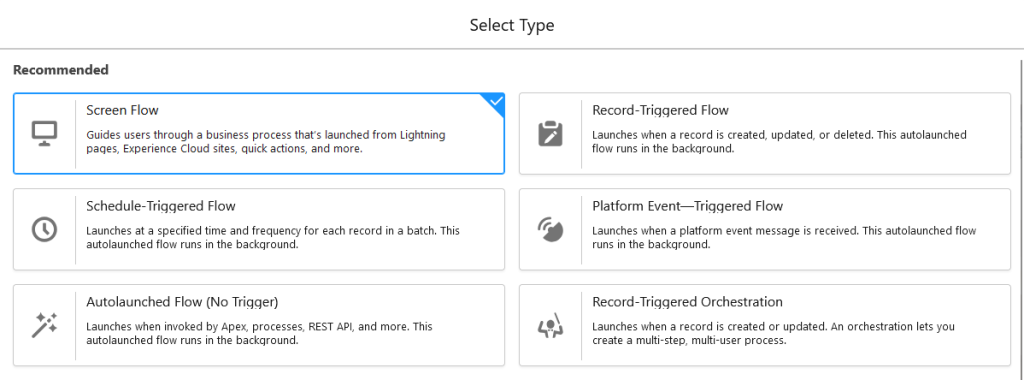
There are several types of flows but for now we’ll focus on the most commonly used ones. We’ll tackle the other types in a future article.
Screen Flow
Kind of like a guided user interface. You can show users information, give them instructions, ask them questions, and prompt them to do certain things (like data entry).
Schedule-Triggered Flow
Can launch at specific times or specific intervals, so like its name suggests, this type of flow runs based on a schedule.
Autolaunched Flow (No trigger)
Launches when invoked by Apex, processes, or REST API (Representational State Transfer Application Programming Interface). They don’t require direct input from users and they’re typically executed by an external mechanism or a process from within Salesforce (ex. They can be invoked by a flow).
Record-Triggered Flow
Probably the most common type of flow. They’re triggered when a record is created, updated, saved, or deleted. You can select if you want it to be triggered every time a change is made or only after specific criteria has been met.
Before Save
Runs before a record has been saved as a new, updated, or deleted record in Salesforce. You’ll probably use this when you have to update the same record that triggered the flow, so you want to modify that record before it’s been saved.
After Save
Runs after the triggering record has been saved, created, or updated. You’ll probably use this if you want to do something that requires interaction with multiple records, not just the triggering record.
Platform Event-Triggered Flow
Triggered by Platform Events. More specifically, these are flows that are subscribed to Platform Event messages. This allows for real-time processing of events from within Salesforce or from an external system, so when the flow (which is subscribed to the Platform Event message) receives said message, it’ll know to execute the flow. For example, maybe you want a flow that will create a task or update a record when it receives that Platform event message.
Record-triggered Orchestration
Just like record-triggered flows, these launch when a record is created, updated, saved, or deleted. The difference is that it’s an orchestration.
An orchestration lets you create a multi-step and multi-user process in a more organized way. It’s a sequence of stages that all involve their own individual actions and elements, each stage can also be assigned to different users.
Components of a Flow
Elements
Elements represent specific actions or functions within the flow. You use them to define what steps a process should take and what logic it should follow. There are some elements that can only be used with a specific type of flow (ex. The Screen element is only available if you’re creating a Screen Flow).
The Elements are divided into 3 categories: Interaction, Logic, and Data.
Interaction
Handles user interaction. Deals with users.
Screen

Screens can be interacted with and they display information. Components like text boxes, checkboxes, radio buttons, and picklists can be included in screens.
Action

Perform an action. For example, sending an email with an email alert or creating a Chatter post.
Subflow

Basically, a flow within a flow. This is a ‘reusable’ flow (a ‘child’ flow) that can be invoked or called from within another flow (the ‘parent’ flow).
Custom Error

Custom error messages that you can create and use instead of the generic error messages. This should help you provide users with more comprehensive instructions and guidance on an issue.
Logic
Manages a flow’s execution path based on certain conditions and decisions. Deals with the flow.
Decision

Implements conditional logic by defining criteria that determines which path a flow should follow.
Assignment

Sets or updates the values of variables or fields.
Loop

Iterates or goes over items in a collection, performing the specified action for each item.
Wait for Conditions

Pauses the flow and resumes after the specified conditions have been met.
Wait for Amount of Time

Pauses the flow and resumes after a set amount of time has passed.
Wait Until Date

Pauses the flow and resumes after a specified date.
Transform

A relatively new element that was introduced in the Winter 2024 release. It maps data (or any field values) from an existing source to a new target.
Collection Sort

Arrange or reorder items in a collection, sorting them based on fields (‘Sort By’) and ascending or descending order (‘Sort Order’).
Collection Filter

Filter items in a collection by applying criteria. It’ll output the filtered results without changing the content of the original collection. Allows you to create new collections that only include items or records that meet the criteria you specified.
Data
Interacts with records and external data sources. Deals with data.
Create Records

Creates new records in Salesforce.
Update Records

Updates existing records in Salesforce with new data.
Delete Records

Deletes existing records from Salesforce.
Get Records

Gets records that meet predefined criteria.
Roll Back Records

Undo changes made to records that were part of the flow’s execution. “Rolling back” to the state everything was in before the flow was executed.
Connectors
Connectors are the lines on your Flow Builder canvas that determine the path a flow takes as it’s being executed. In other words, “What leads to what? What element should I (the flow) execute next?”
Resources
A value or some sort of variable that a flow’s elements can reference. Numbers, records, text strings, formulas, etc.
How to build Flows
The Salesforce Flow Builder
This is where the magic happens. If you’re not sure how to access the Flow Builder, follow the steps below.
1) Go to the Setup menu and type ‘flows’ in the Quick Find search box.
2) Click Flows (located under Process Automation in the Quick Find bar) and it’ll bring you to a list of all your existing flows.
3) Click the “New Flow” button off to the side and you’ll be directed to the Flow Builder.

Layout
There are two layouts available. Free-Form and Auto-Layout. You can switch between the two whenever you want.
Free-Form
You have full control over the placement of all the elements and connectors.
People tend to prefer building flows using the free-form layout since there’s more flexibility and freedom to arrange components however you’d like.
Auto-Layout
Salesforce automatically positions the elements and connectors for you. Your canvas will look cleaner and components will be organized in a more consistent manner.
When you get to your canvas, you’ll see a screen asking you how you’d like to start building your automation. You’ll be given two options:
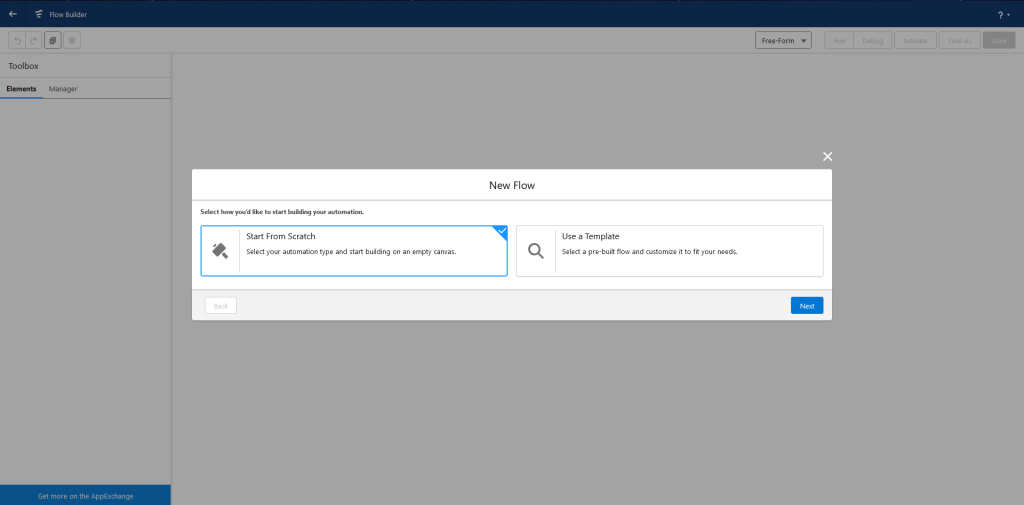
Start from Scratch
You can build the flow yourself, from scratch. You’re completely free to build it however you like.
Use a Template
You can select a template and create a flow using that. A lot of elements are pre-configured and field mappings are predefined. That doesn’t mean you can’t edit anything, you can still customize elements.
You should already have access to a couple of templates right out of the box, courtesy of Salesforce. But, you can also visit the Salesforce AppExchange to get other flow templates.
Check out this article for template recommendations.
Pick whichever you prefer and you can start building.
Keyboard Shortcuts
Here are some useful keyboard shortcuts. Most shortcuts will work no matter what layout you’re using but there are a few that are meant to be used for only Free-Form or only Auto-Layout.
- Zoom In: CTRL + ALT + =
- Zoom Out: CTRL + ALT + –
- Zoom to fit: CTRL + ALT + 1
- Zoom to view: CTRL + ALT + 0
- Select multiple elements: SHIFT + CLICK
Note: This is a Free-Form layout shortcut
- Delete elements: BACKSPACE
Note: This is a Free-Form layout shortcut
- View keyboard shortcuts: CTRL + /
Note: This is a Free-Form layout shortcut
- View description of element: CTRL + i
Note: This is and Auto-layout shortcut
How to delete flows
Deleting a flow is simple, just click the drop down menu to the far right of the flow in question, click “View Details and Versions” and you’ll see the delete button on the screen it brings up.
Why can’t I delete my flow?
- Check if the flow you’re trying to delete is Managed or Unmanaged. Look at the “Package State” column in your list of flows here. If it’s part of a managed package, you’ll have to uninstall that package.
- Check if the flow is currently active. You can’t delete an active flow so make sure to deactivate it.
- Check if the flow is being referenced elsewhere in Salesforce, you won’t be able to delete it if so. Luckily, Salesforce will actually tell you where the flow is being used so just follow the trail of errors it sets out and remove the references one by one.
How to test flows
Use the Debug tool (located next to the ‘Run’ button, to the upper right of your Flow Builder canvas) to test and troubleshoot your flow. It’ll provide you with real-time details on how your flow performs each of the ‘steps’ you’ve told it to do.
If anything goes wrong you’ll see an error message. You can quickly review the logs, pinpoint what the issue is (Where is the flow failing? Why is it failing?) and fix it.
How to deploy flows from sandbox to production
If you want to deploy a flow from a sandbox or non-production environment to your production org, make sure everything’s configured correctly beforehand. You want to be certain that a flow works as intended before deploying it.
Change Sets
Probably the most common method. You can use change sets to deploy flows from one environment (in this case, your sandbox) to another (your production org).
If you’re not sure how to use Change Sets to deploy flows, follow these steps.
- Log in to your sandbox org.
- Go to Setup, type “Change” in the Quick Find box and click “Outbound Change Sets”
- Click the “Add” button on the “Change Set Components” section of the page.
- In the drop down menu, select “Flow Definition,” click the flow you want to deploy and then click the “Add to Change Set” button on the bottom of the page
- In the “Profile Settings For Included Components” section, click “Add Profiles” so you can set which profiles have access and once you’re done, click “Add to Change Set.”
- Now, in the “Change Set Detail” section of the page, click “Upload” and select your target organization (your production org).
- You’ll receive a message stating that your upload is in progress and that Salesforce will tell you when it’s done. Once it’s complete, you’ll receive another message saying that the change set was uploaded successfully.
- Now go to your production org. Search “Inbound” in the Quick Find box and select “Inbound Change Sets”
- In the Change Sets Awaiting Deployment section, click “Validate” to check for any errors.
- If everything’s working, you can now click “Deploy”
Best Practices for Salesforce Flows
This is by no means an exhaustive list. There are a lot of best practices you should keep in mind but at this stage, so early on, we’re gonna keep it simple.
For a more extensive list of best practices, please take a look at this article.
Document, document, document
Document everything as comprehensively as you can. Make sure it’s clear what the flow does and how it operates. Use the description text box to (briefly) explain what each element is for and what it’s supposed to do. A little context can go a long way.
Plan your flow before you build
Instead of jumping into Flow Builder immediately, try to outline your flow on a diagramming application (ex. Lucidchart, MS Visio, diagrams.net) or you can sketch it out using pen and paper if that’s what you prefer.
Show the logic you’re gonna use and how you plan to get specific information. By mapping out your flow like this, you’ll save yourself a lot of time in the long run since you’ll be able to identify any potential problems early on.
Set up Fault Paths
A fault path determines what actions are taken to handle errors that occur during the execution of a flow. Should it show an error screen? Send an email alert to notify someone? Log the error?
By setting up fault paths you can ensure that even if something goes wrong, the flow can manage any errors that occur.
Use Subflows
Subflows are flows within flows. Essentially, it’s a flow that’s invoked by another flow. If there’s a common set of actions you usually incorporate into a lot of other flows, make those actions into a subflow that you can then invoke whenever you need to.
This makes managing complex flows much easier since everything is more streamlined. If you need to update the subflow’s logic, you can just make changes to one thing (the subflow) instead of multiple different things (all the other flows).
Don’t put DML (Data Manipulation Language) Statements in Loops
In other words, try not to use the pink colored elements inside a loop. Pink elements are Data elements, these include the Create Records, Update Records, Get Records, and Delete Records elements you’ll see in Flow Builder. You’ll want to avoid using these inside a Loop because you don’t want to hit a governor limit.
Salesforce operates a multi-tenant system, several different clients all access the same resources for computing. Salesforce enforces limits so that no individual client can monopolize shared resources.
Check out the official Salesforce documentation here for more information on governor limits.
Other Considerations
Common Flow Limitations
- Maximum of 50 versions per flow, per org.
- The maximum number of active flows per flow type depends on your org’s edition
- 5 for Essential or Professional edition orgs
- 2000 for Enterprise, Unlimited, Performance, or Developer edition orgs.
- The maximum number of total flows per flow type also depends on your org’s edition.
- 5 for Essential or Professional edition orgs
- 4000 for Enterprise, Unlimited, Performance, or Developer edition orgs.
For more information on Flow Limits, please refer to the official Salesforce documentation which has been linked here.